How I Made My Own Standing Desks for My Classroom
Want to make your own standing desk-bound? Learn from this instructor who took a totally DIY approach to culling seating in her classroom.
Several years ago, I moved to a new-to-me classroom. It has a set of tall cabinets topped with counter space, and I noticed my students liked to piece of work there whenever they could. Their interest in this space made me start researching continuing desks.
I fix a projection through DonorsChoose.org, an organization I had successfully used earlier, to asking the funding. I took to social media to annunciate my projection, but I wasn't able to enhance one-half the funds I needed.
Finally, I hatched a plan to raise my traditional desks to the height of the counter using a PVC pipage frame. I've had several people ask me how I was able to make standing desks and then easily and cheaply. So here's how I did it!
Measure start
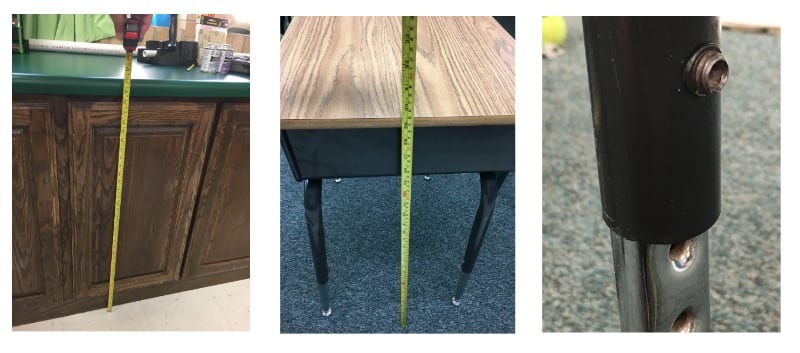
I started by taking measurements: the summit of the pop counter, the height of my current wobbly desks, and the circumference of the fattest part of the leg (the commodities that held the two parts of the leg together).
Get together supplies

After sketching out my idea, I headed to the local hardware store to purchase supplies. I needed two different sizes of PVC pipe: ane ½ inch to brand the legs and ¾ inch to make the cross pieces that held the legs together. I bought couplings to connect pipes together and cap ends to make anxiety and then that the legs wouldn't scratch the floor. I as well had to make a trip to a plumbing store to get T fittings that would connect the larger pieces to the smaller ones. Other supplies I bought included: fine grit sand paper, PVC piping glue, and black spray paint.
Make your cuts
I used the tape measure out from my tool kit to get exact measurements. Then my husband contributed a saw to cutting the larger pipe and a miter box to guide the saw and a PVC pipe cutter for the smaller pipe. I carefully measured each length of pipe, marking where they needed to be cut.
Time to pigment

Once I had all of the pieces cut, I headed exterior with a big sheet of bulletin board paper and the paint. The air current and the uneven ground made standing the pipes on their ends incommunicable, so I dug out some skewers and improvised.
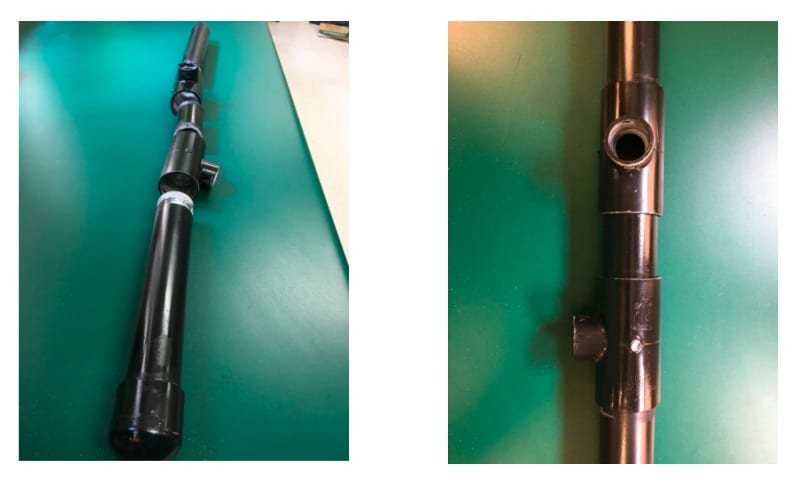
Measure once more

Here are all the pieces, painted and gear up to be assembled. I used 4 end caps, ii longer pieces of i ½-inch piping, six shorter pieces of 1 ½-inch piping, half dozen T joints that had openings for 1 ½-inch and ¾-inch pipe, 2 couplings for 1 ½-inch pipe and three lengths of ¾-inch piping. Earlier assembling the legs, I measured how much of the leg would be hidden in the joint and sanded that part to brand it easier to slide the parts together.
Assemble the front legs

I started by putting the stop caps on the lesser of the ii long ane ½-inch pieces that formed the forepart legs. Then I added a T joint and a shorter slice of 1 ½-inch pipe that formed the superlative of the front end leg. I made certain that the 2 legs were the same length and that the T joints were the aforementioned distance from the bottom of the leg. I ended up feeling similar I didn't need to glue the pieces together because they fit really tightly. If the pieces had fit together loosely, I would have needed to glue them to preclude the length from irresolute as students used the desks
Get together dorsum legs
To assemble the dorsum legs, I started by putting the end caps on the bottom of two of the 1 ½-inch pipes. I added a T articulation and a coupling and so a second T joint at a right angle from the kickoff T joint. Then I added another slice of 1 ½-inch pipe to class the peak of the dorsum leg. I fabricated sure that the T joints were all the same distance from the bottom of each leg as their counterpart on the other back leg and the front leg.
Finish it off
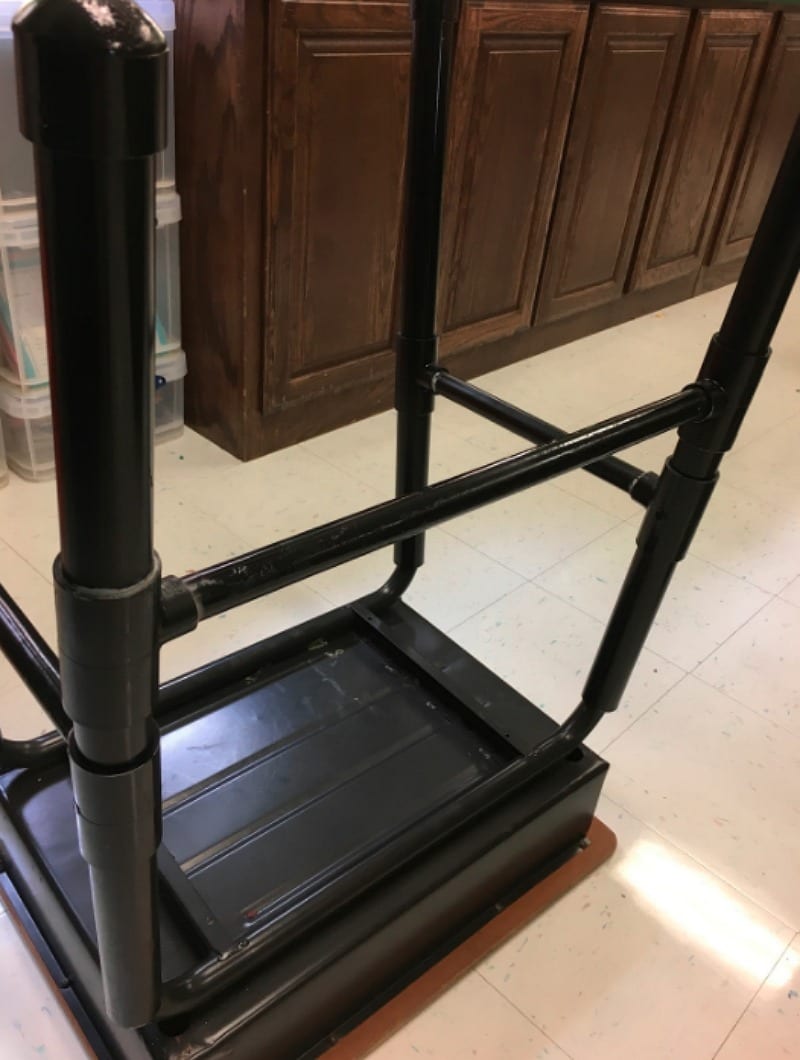
To gather the desk-bound I slipped each leg over the respective legs of the desk, fluctuant them a scrap to get them past the pesky commodities. Then I shoved one finish of each cross piece into the T and wiggled information technology into the corresponding T on the other leg. I used a black Sharpie mark to encompass any places where I accidentally scratched the paint off.
Watch the video to run across how these desks all came together.
[embedyt] https://www.youtube.com/scout?5=9U1CLTOGLXc[/embedyt]
Would you ever make your own standing desk for the classroom?

Source: https://www.weareteachers.com/make-your-own-standing-desk/